|
^^i would not suggest doing it like that, it will probably fall apart, and will sound like shit (im assuming hes saying to just create the cover pieces and not build an actual box).
do it this way. build (or buy) the correct box for the speakers. if you need more help w/ that google, youll read for days. you could glass it in the tire well if you want, but if you are only installing 2 12"s in a sealed box, you would probably be better off (and less frusterated) just building a basic rectangular box. you will also still be able to access the spare in emergencies. to secure the box, you can use L-brackets or do like i did: pressure-fit it into the trunk. to do this, the box will need to be 40" long and 20" tall (ythe measurment running from the front of the trunk near the seats toward the tailights). let the airspace and depth requirement of the subs determine the hieght of the box. if the box is going to be too shallow to fit the subs in, invert them!
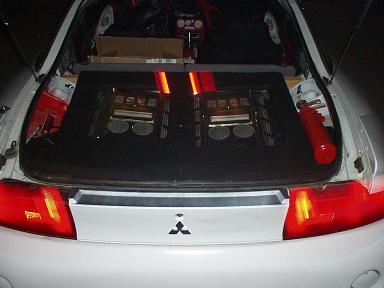
ok, now youve built the box, and it plays, and sounds great. its make-things-pretty time. you will need to construct two piecees here: one to fit over the top of the subs, and one to concel wiring (et al.) when the rear seats fold down. this is the hard part. first, build the piece behind the rear seats. using cardboard, or any heavy-wieght (non-flexable) material, design a template to conform to any curvature or nooks. in the example pic, it looks like this piece is just a rectangle, which is easy. just measure and trim until youve got it right. tranfer the outline of the template to some wood (almost anything will do here, its not going to need to hold in any air-pressure from the subs). if you are going to vynil or paint the piece, dont use a "grained" wood, use mdf or similar "smooth" material. i would suggest 1/4-1/2" MDF.
the top piece will be a bit more difficult, as you have to worry about a couple things here: 1)the curvature on the sides, and (2) cutting openings for the subs to "poke out" of. use the template method once again to get the curvature right. remember, you dont have to make it one huge piece. i like to work with small (1'x1') pieces of cardboard to get the curve of each section correct. then ill tape up the pieces together as i go along. a compass will help transfere curvature here, as you can use the non-drawing "leg" to go around the curves while the pencil "leg" transfers those archs onto the template material. there are a couple other methods for transfering dimentions onto a template, but they are pretty damn involved and not really worth the time, lol. using a compass and your eyes is the best way.
so now you have your curvature of the outer part of the top baffle. next you need to line-up the holes for the subs. i like to secure the templaet ive made into place and then reach under with a pencil (from the backseat) to mark the outer dimentions of the sub box. then you can just use a measuring tape to figure out the rest. if you crate a cuttout large enough for the ubs to fit through on the template, and then create a "center" template spaced correctly for the subs, you can fine-adjust the center piece to the rest of the template and tape it in place when it all lines up. now you have all the pieces together, so trace the template onto so 1/2" MDF and cut away.
so now you have the box, the back baffle, and the top baffle. test fit everything one more time to make sure it all lines up and alter anything you dont like. attach the baffle pieces with velcro, and drive around with it like that for a couple days. if theres anythign you need to cahnge (rubbing/squeeking/vibration/looseness) nows the time to do it. once all the glitches are taken care of, its time to upholster. because i dont know what material you want to use, ill save my fingers for now, lol. the above instlal uses vinyl, but they did a pretty bad job of smoothing the edges of the baffles out enough to prevent wavyness. you might want to wait until you are ready to upholster before you decide. carpet is always easy, and covers up blemishes very well.
i just realised i forgot about the amprack..fuck, lol. real, real easy: off of the original subbox, just attach some thick wood supports laying horizontal to the box, and pointign toward the front of the car. cross-brace them for support. from there, attach a platform made out of scrap wood you will probably have left over from the rest of the install. the angled pieces are going to require some geomitry and woodworking skills, so i dont suggest it. instead, you could build some legs off of the platform to "float" the amps in the air, level with the top of the sub box. attach more crossbracing to the subbox at the top of the platforms, and cut the appropriate hole in the top baffle to let the heatsinks show through. if you dont have enough space to do this, just add angled "rafters" off of the base platform, crossbrace, add supports to the top of the box, and attach the amps. by this point you should be comfortable enough with construction and fabrication to do all of it easily.
WHEEEEEEEEEEEWWWWWW hope that helps a bit. i tried to be as thorough as i could so i didnt miss any points. just rememerb it like this: start with the frame, add your pretty parts, make sure it works, upholster.
edit: oh yea, and wrong forum ya fuckin n00b.  :shhh: i do cocaine :/shhh:
|

 Search
 Printer-friendly copy
 1 User in Chat