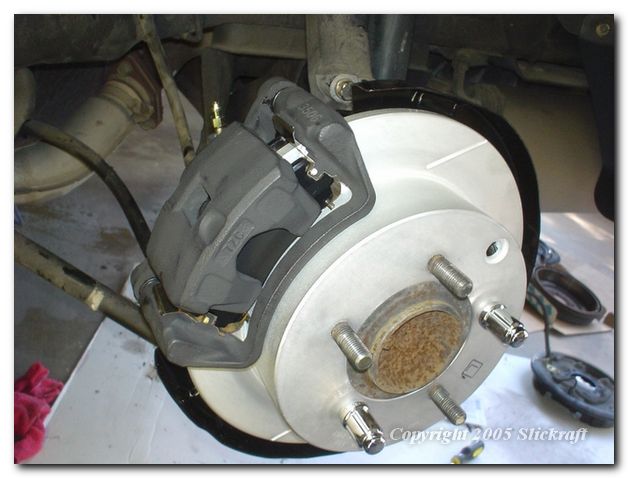
Peace, I'm in the process of convertin' my drums to discs and unfortunately, there aren't any GS/GST's around for me to remove them from. I did however find a 2G Talon ESi with rear discs and of course the obvious que. is, will those calipers be the same and would work?
#28352, "RE: Rear Brake Conversion..." In response to Reply # 0
YES go get them and throw them on.
________________________________________ 95 Eclipse RS - Rolled 96 Eclipse GS - Traded 95 Eclipse GSX- Sold 01 Blazer LS 4.3/5spd dropped and clean DD 88 Camaro RS 361 CID with a 6spd and a bar 10 second street car on motor.
#28353, "RE: Rear Brake Conversion..." In response to Reply # 1
Originally posted by shazow1969 YES go get them and throw them on.
Peace, Good lookin' out for the confirmation... If you wouldn't mind, I'd like your opinion on this too. I basically have the calipers and the caliper brackets... I still needed a few parts to complete the swap, so I contacted mitsubishigraveyard.com and he quoted me this price for the parts... I wanted to know if you fellas or "fella-ets" think that this amount is fair or too much?
Quote: "2g rear backing plates with cables and emergency brakeshoes - $120.00 shipped"
#28354, "RE: Rear Brake Conversion..." In response to Reply # 2
Yeah that's $20 less than I paid for them at the same place. It was a good deal when I did it, I'd say it's a good deal now. Be prepared to straighten or remove the dust shields cuz they will be bent up. I'd remove them as it's easier to deal with and allows more air to get to the rotors.
-Kevin
________________________________________ 95 Eclipse RS - Rolled 96 Eclipse GS - Traded 95 Eclipse GSX- Sold 01 Blazer LS 4.3/5spd dropped and clean DD 88 Camaro RS 361 CID with a 6spd and a bar 10 second street car on motor.
#28420, "RE: Rear Brake Conversion..." In response to Reply # 4
Originally posted by azdave Maybe this will help with the swap? 2G Rear Brake Drum-to-Disc Conversion Tech Topic http://www.rcaz.com/rcaz/sub%20indexes/drum_to_disc/index.htm I used the existing e-brake cables from my drum brakes with the backing plate mod shown. I found that was easier than swapping out the entire cables.
Peace, This is the BEST "write-up" regardin' the Drum to Disc Conversion. Much, Much Respect. The illustration is........it's jus the best. I only have a problem understandin' how to adjust the brake shoes. I'll figure it out, but as of now, that's the only thing "holdin' me back"... I still need to purchase the backin' plate and flex line for the calipers, I purchased the calipers without the flex line.
#28422, "RE: Rear Brake Conversion..." In response to Reply # 5
Originally posted by Jem09
snip
I only have a problem understandin' how to adjust the brake shoes. I'll figure it out, but as of now, that's the only thing "holdin' me back"... I still need to purchase the backin' plate and flex line for the calipers, I purchased the calipers without the flex line. Great work with the "write-up"... Peace, Jem
Adjusting the e-brakes after the swap:
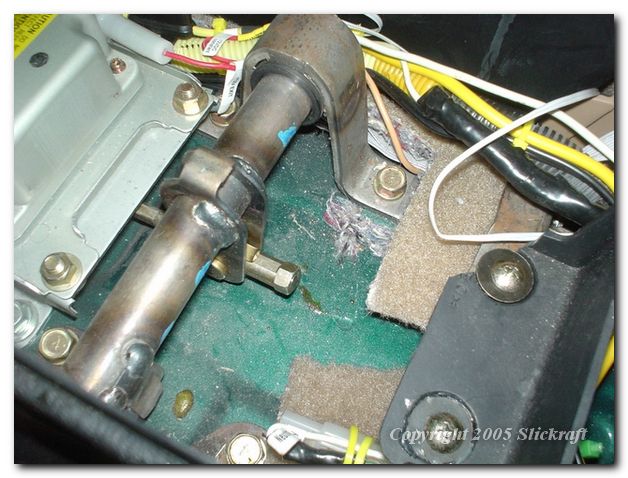
Remove the cupholder and ashtray unit from the center console. Back out the adjustment nut on the e-brake cable until the nut is flush with the end of the rod. (See pic #6 on the web page)
Both rotors should be on and spinning freely. Remove the rubber dust plug from the front face of the rotor and reach in with a small bladed screwdriver and ratched the adjustment wheel so the shoes will expand. Keep spinning the rotor and adjusting the wheel until a light drag is felt. Do this for the other side too until both drag slightly.
Now pull the e-brake handle and release several times. This will help center the shoes inside the drum. Now go back and do the adjustment again. It may not need anymore adjustment but more than likely the shoes will have shifted a bit and there will be less drag felt on one or both sides. After you have both sides adjusted with a slight amount of drag on each rotor and the e-brake handle engages correctly (2-3 notches up) assemble the rest of the brake system.
During a road test you will need to seat the e-brake shoes for best operation as well as the main disc pads. Follow the manufacturers recommendations for seating the new pads. For the e-brake shoes, in a safe area, lightly apply the e-brake while driving slowly maybe 15-20 mph for about 100 yards. Do this several times letting the shoes cool down each time. Now you can fine tune the adjustment nut on the e-brake handle if you like it to engage later or earlier. Just be sure you aren't driving around with the e-brakes on slightly. I have mine set at about 3 clicks to first engagement.
Please not a common misconception. The e-brake shoes are NOT self-adjusting like standard rear drum brake shoes. They will probably never ever need adjusting again unless you drive around with them on accidently.
#28424, "RE: Rear Brake Conversion..." In response to Reply # 6
Originally posted by azdave
Originally posted by Jem09 snip I only have a problem understandin' how to adjust the brake shoes. I'll figure it out, but as of now, that's the only thing "holdin' me back"... I still need to purchase the backin' plate and flex line for the calipers, I purchased the calipers without the flex line. Great work with the "write-up"... Peace, Jem
Adjusting the e-brakes after the swap: Remove the cupholder and ashtray unit from the center console. Back out the adjustment nut on the e-brake cable until the nut is flush with the end of the rod. (See pic #6 on the web page) Both rotors should be on and spinning freely. Remove the rubber dust plug from the front face of the rotor and reach in with a small bladed screwdriver and ratched the adjustment wheel so the shoes will expand. Keep spinning the rotor and adjusting the wheel until a light drag is felt. Do this for the other side too until both drag slightly. Now pull the e-brake handle and release several times. This will help center the shoes inside the drum. Now go back and do the adjustment again. It may not need anymore adjustment but more than likely the shoes will have shifted a bit and there will be less drag felt on one or both sides. After you have both sides adjusted with a slight amount of drag on each rotor and the e-brake handle engages correctly (2-3 notches up) assemble the rest of the brake system. During a road test you will need to seat the e-brake shoes for best operation as well as the main disc pads. Follow the manufacturers recommendations for seating the new pads. For the e-brake shoes, in a safe area, lightly apply the e-brake while driving slowly maybe 15-20 mph for about 100 yards. Do this several times letting the shoes cool down each time. Now you can fine tune the adjustment nut on the e-brake handle if you like it to engage later or earlier. Just be sure you aren't driving around with the e-brakes on slightly. I have mine set at about 3 clicks to first engagement. Please not a common misconception. The e-brake shoes are NOT self-adjusting like standard rear drum brake shoes. They will probably never ever need adjusting again unless you drive around with them on accidently.
I see it clear as day now... Once again, thank you for the elaborate explaination and help!

 Search
 Printer-friendly copy
 1 User in Chat