| Go back to previous topic |
| Forum name | Performance/Engine |
| Topic subject | Install day pics. |
| Topic URL | https://forums.2gnt.com/dcboard.php?az=show_topic&forum=i5&topic_id=128290 |
128290, Install day pics.
Posted by CODE4, Oct-17-09 07:13 PM
Camp Pendleton Hobby Shop.
http://zero-signal.org/2.4L/installday/102_1773.JP G
All the way through ~102_1810.JPG
Motor is in currently, just need to hook up wires and lines tomorrow.
|
128291, RE: Install day pics.
Posted by dalesmitsu, Oct-17-09 09:05 PM
Clean engine bay.
|
128292, RE: Install day pics.
Posted by teklein, Oct-17-09 10:00 PM
Very awesome Dave.
Congrats on having one beast of a 2gnt.
|
128293, RE: Install day pics.
Posted by 420agreenvilleSC, Oct-17-09 10:21 PM
DAMNIT that looks like fun... :(
ok i wanna point out things i LOVE:
1. BLUE FLEXPLATE FTW LOL
2. bad ass return fuel line setup.
3. umm... EVERYTHING
i guess you left your clutch on the input shaft still on the trans? i didn't see it... I hope you don't spend too much time finding what hole on the flexplate aligns w/ what thread hole on the clutch. Don't forget to use some sort of threadlocker too... don't let this be you...
http://forums.2gnt.com/dcboard.php?az=show_topic&forum=34&topic_id=7972&mode=full
|
128294, RE: Install day pics.
Posted by CODE4, Oct-18-09 12:02 AM
Blue Flexplate is an SFI rated one I bought from Dougie.
I cut the OEM fuel supply line, installed -5 AN tube sleeve and nut, flared the tubing, and ran it to the Aeromotive.
I used brand new OEM flexplate bolts with blue threadlocker, torqued to spec. I chased the threads on the crank as well. I bought ARP bolts for the flexplate to CM FX600 twin disc }(
|
128295, RE: Install day pics.
Posted by 420agreenvilleSC, Oct-18-09 01:02 AM
Originally posted by CODE4
I used brand new OEM flexplate bolts with blue threadlocker, torqued to spec. I chased the threads on the crank as well. I bought ARP bolts for the flexplate to CM FX600 twin disc }(

|
128297, RE: Install day pics.
Posted by nicho919, Oct-18-09 09:29 AM
Sick. This gives me some idea of what I'm in for with my rebuild. Thanks for the pics. When you put the motor in, did you have the UDP installed? Also, what order did you pull the mounts, and is that a stock fuel rail, or aftermarket?
Nice ride.
|
128301, RE: Install day pics.
Posted by 420agreenvilleSC, Oct-18-09 10:33 AM
Originally posted by nicho919
When you put the motor in, did you have the UDP installed?
the pics show that he didn't.
|
128302, RE: Install day pics.
Posted by ez, Oct-18-09 12:32 PM
Mwahahahaha! That's going to be fun :cheers
I remember when Josh was doing all his work at that garage - it's more like a birthplace for 2.4s now.
|
128304, RE: Install day pics.
Posted by CODE4, Oct-18-09 04:28 PM
UDP went on after the motor was in.
Only mounts that are removed are the passenger side, obviously, and the front roll stopper as I also removed the whole center cross member.
|
128305, RE: Install day pics.
Posted by CODE4, Oct-18-09 04:32 PM
Well, today was productive but also pissed me off. My nice fabbed and powdercoated lower water pipe is useless. For some reason my measurements were off when accounting for the starter. Everything is back together, the hood does not shut all the way (38mm TiAL bumping the hood) and no fluids in.
I have some pictures on my phone of everything installed. Put them up later. I was really hoping to fire the bitch up today but I need to solve my lower water pipe issue.
|
128306, RE: Install day pics.
Posted by 420agreenvilleSC, Oct-18-09 05:29 PM
patience w/ these cars. they require patiennnnnnncceee
|
128307, RE: Install day pics.
Posted by CODE4, Oct-18-09 06:12 PM
I know, I was just hoping to have this bitch up for work tomorrow...
|
128308, RE: Install day pics.
Posted by djtrickee, Oct-18-09 06:26 PM
Nice install, but there is obviously something wrong with your camera...
|
128309, RE: Install day pics.
Posted by eclipse982nrRST, Oct-18-09 06:59 PM
I see one ginormous ass pic and nothing else :shrug
|
128310, RE: Install day pics.
Posted by adamzty, Oct-18-09 07:01 PM
Originally posted by eclipse982nrRST
I see one ginormous ass pic and nothing else :shrug
Do it right, and you will see 37 ginormous ass pics.
Looks good, Dave. I see an external voltage regulator. Planning to remove the stock ECU?
|
128311, RE: Install day pics.
Posted by CODE4, Oct-18-09 07:11 PM
I have been running that external Voltage regulator for about 3 years now after my ECU's VR circuit shit the bed.
Well only spent 6 hrs on it today, was out of the hobby shop (not in the Eclipse unfortunately) at 1430. My biggest setback was discovering that my modified/powdercoated 420a lower waterpipe did not have clearance for the starter. FUCK. With some rage in the blood I attempted to bend it outward toward the radiator a bit (not on the car, on the bench) with no success. Put the bitch in a vice, and only succeeded in crushing the parts of the pipe that came in contact with the vice jaws. Surprisingly the powdercoat did not scratch, chip, or flake.
Continued to install everything, else: alt, UDP, belt, fuel lines, IC piping, BOV, WG. Everything is buttoned up at this point. No fluids in yet as there is no lower water pipe. I am pissed at this point but glad that it is relatively a minor issue.
My options at this point are to run a 2.4 PT water pipe that does a 90* turn after exiting but I think it may put the radiator hose into the dump tube. Alternatively, I can cut the 420a water pipe further back and get some kind of custom hose - bendable kind that summit sells or something.
Spent the past three days wrenching and am a bit drained. Any suggestions?
|
128316, RE: Install day pics.
Posted by dalesmitsu, Oct-18-09 08:56 PM
Originally posted by CODE4
My options at this point are to run a 2.4 PT water pipe that does a 90* turn after exiting but I think it may put the radiator hose into the dump tube. Alternatively, I can cut the 420a water pipe further back and get some kind of custom hose - bendable kind that summit sells or something. Any suggestions?
Get an extra 420a h2o pipe and 2.4 pt h20 from a pull apart. Test out the 2.4 pt h20 first. If fails, do your alternative. The extra 420a h20 pipe is just in case a fellow 2gnt member suggestions some else with stock water pipe.
|
128312, RE: Install day pics.
Posted by CODE4, Oct-18-09 07:12 PM
Originally posted by eclipse982nrRST
I see one ginormous ass pic and nothing else :shrug
After looking at the first image, change the tailing number to one that is numerically higher, ~80, ~81, etc.
|
128313, RE: Install day pics.
Posted by CODE4, Oct-18-09 07:20 PM
http://zero-signal.org/2.4L/2.4-install-7.jp g
http://zero-signal.org/2.4L/2.4-install-8.jp g
http://zero-signal.org/2.4L/2.4-install-9.jp g
|
128314, RE: Install day pics.
Posted by irregular defect, Oct-18-09 08:05 PM
I can't eve get the first pic to pop up. Yes, I'm adding the g. wtf. i wanna see this. Haha..
|
128315, RE: Install day pics.
Posted by CODE4, Oct-18-09 08:30 PM
Make sure it is a capital G
|
128318, RE: Install day pics.
Posted by Star Turbo Talon, Oct-18-09 10:45 PM
Very nice Dave. Motor appears to sit nice and level. Mount fit well?
|
128319, RE: Install day pics.
Posted by CODE4, Oct-18-09 10:50 PM
Originally posted by Star Turbo Talon
Very nice Dave. Motor appears to sit nice and level. Mount fit well?
Fits like a condom :P
|
128324, RE: Install day pics.
Posted by CODE4, Oct-19-09 06:33 PM
Originally posted by CODE4Originally posted by eclipse982nrRST I see one ginormous ass pic and nothing else :shrug After looking at the first image, change the tailing number to one that is numerically higher, ~80, ~81, etc.
Come on Mike, seriously? See how the file that ends in .JPG is a number? Just increase the last digit by 1. For example on a digital camera as the photos are stored, the file names are blah0010.jpg, blah0011.jpg, blah0012.jpg? Instead of posting links to numerically higher files for 30 files or so, I give the link for the first one, and state the rest go incrementally up.
|
128323, RE: Install day pics.
Posted by eclipse982nrRST, Oct-19-09 06:30 PM
Well wtf...besides adding the G to the linky, how do you see more pics?
I never understood why you people just dont post the damn pics on the forum, since we do have file upload option now :shrug
|
128326, RE: Install day pics.
Posted by 420agreenvilleSC, Oct-19-09 07:12 PM
Originally posted by eclipse982nrRST
Well wtf...besides adding the G to the linky, how do you see more pics? I never understood why you people just dont post the damn pics on the forum, since we do have file upload option now :shrug
i'll teach you how to work a computer if you come fix my car :)
|
128327, RE: Install day pics.
Posted by djtrickee, Oct-19-09 07:35 PM
Originally posted by 420agreenvilleSCOriginally posted by eclipse982nrRST Well wtf...besides adding the G to the linky, how do you see more pics? I never understood why you people just dont post the damn pics on the forum, since we do have file upload option now :shrug i'll teach you how to work a computer if you come fix my car :)
When he is done it will way 2,458 Lbs. more and be green/orange/yellow though...
|
128328, RE: Install day pics.
Posted by xcasbonx, Oct-19-09 09:06 PM
Everything looks to be coming together now. Great job, can't wait to hear when it's running man.
|
128331, RE: Install day pics.
Posted by Ebster1085, Oct-20-09 01:13 PM
Looks awesome Dave. I especially like the fuel line and coolant line setup.
Cant wait for some vids!
|
128362, RE: Install day pics.
Posted by clipse97, Oct-21-09 09:30 PM
looks good!
|
128371, RE: Install day pics.
Posted by CODE4, Oct-22-09 07:06 PM
Update on what is preventing me from starting her up:
-16 AN fittings and hose have arrived. Tomorrow my goal is to have the -16 bungs welded on the radiator and the waterpipe. Additionally I need a bung welded on for the coolant hose from the turbo.
During some reflection, I realized I made a critical error when installing the new TOB and clutch. When removing the stock clutch fork the white teflon tip fell off and I assumed it was part of the old fork. I installed the new fork onto the bare stud and went with it. Obviously after reality set in I was furious because now I have to pull the tranny out. Luckily my Mopar dealer had a new pivot in stock, part 4670240, for $12.00.
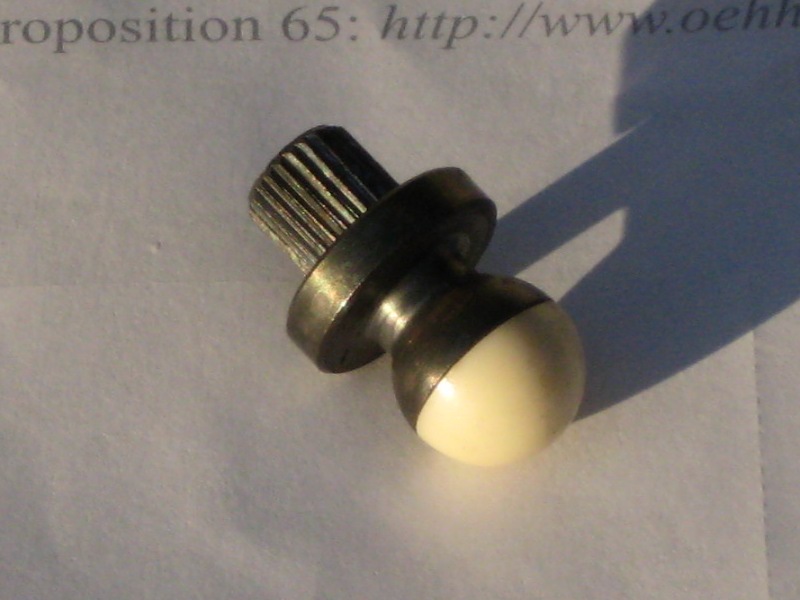
Since the trans is coming out, it gives me the opportunity to replace the driver's side CV axle. Picked a new (not reman) up for $75 today. Cardone brand. Had an issue at the parts counter as I wanted an axle without the ABS ring on it but all the parts they kept giving me had the ring. Finally looked at it more closely and saw that the ring is removable for non ABS applications.
Also I was not 100% happy with the way one of the flexplate to aluminum flywheel bolts felt upon install. During torquing to 55 lbs/ft one of them felt as if it were about to let go. Did not have much of an option at the time and I crossed my fingers on the threadlocker to do its job. As the trans is coming out now, I am going to drill out all four holes on the aluminum flywheel and install 1/2 x 20 Timeserts (http://www.timesert.com/html/inchsert.html). With those inserts in I am going to install some ARP hardware. The 1/2 x 20 fasteners will provide an increase in surface area for pull-out strength in the aluminum parent material.
Important to note if anyone is considering this in an aluminum flywheel to verify you are not interfering with anything by enlarging the holes. As I am running a CM FX600 twin disc, the pressure plates and friction discs are smaller in diameter than a single disc setup allowing me through hole access to the four mounting points.

|
128377, RE: Install day pics.
Posted by bullettdsm, Oct-23-09 02:06 AM
Originally posted by CODE4 I installed the new fork onto the bare stud and went with it. Obviously after reality set in I was furious because now I have to pull the tranny out. Luckily my Mopar dealer had a new pivot in stock, part 4670240, for $12.00.
Couple of things. Did you get the upgraded fork? My buddy just got one from his dealer connection and the new fork had a "redone" socket that looks to have a much better "snap in and hold" quality (for lack of better descriptors, lol). Its no longer just the three prong metal piece (just an fyi).
As for the white teflon tip on the pivot ball, I generally just replace the tip. I've had problems with pulling that out (I don't have a slide hammer. Which, as I could see, would be the way to take them out). The post doesn't really see any pressure/leverage. That little cover just snaps right on and off.
|
128380, RE: Install day pics.
Posted by CODE4, Oct-23-09 07:27 AM
Mark,
The fork is an OEM fork that was cut slightly and had some bar stock TIG'ed into it for reinforcement. Bought it from Dougie along with the FX600.
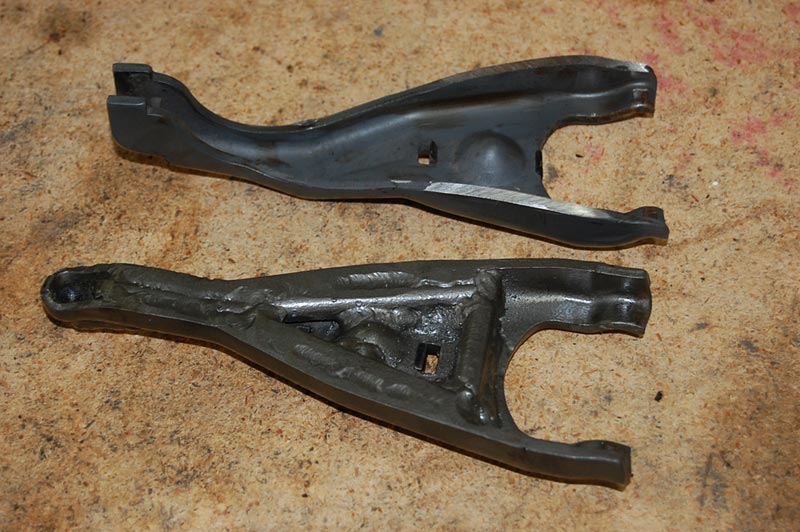
I believe the pivot side of it looked similar with the prongs on it. Under the prongs there perhaps another Teflon piece captured in it? I cannot say for sure but will look at more closely obviously when the trans comes out.
The old clutch part number was 04796665, however the online discount parts websites are down as of right now. I will check back later to see if the part number has superseded.
EDIT: Part # 4796665 comes back listed for all models 1995-1999 and for the 2001-2009 PT Cruiser. Safe to assume then if a redesign occurred that the part number remained the same as opposed to superseding it.
|
128381, RE: Install day pics.
Posted by 420agreenvilleSC, Oct-23-09 10:07 AM
What's ur goal with ur car? power? autocross? DD?
|
128382, RE: Install day pics.
Posted by CODE4, Oct-23-09 10:13 AM
Fast street car, soon to be retired from DD status. Once settled down in Tampa, FL, I would be interested in participating in some local autocross events.
|
128396, RE: Install day pics.
Posted by teklein, Oct-24-09 07:51 AM
Originally posted by CODE4
Fast street car, soon to be retired from DD status. Once settled down in Tampa, FL, I would be interested in participating in some local autocross events.
Autocross!
Thats what im building my car for. I bought the Neon for that, but the 2gnt should be able to do just as good. Run it in SM :P
|
128395, RE: Install day pics.
Posted by bullettdsm, Oct-24-09 03:35 AM
Originally posted by CODE4
I believe the pivot side of it looked similar with the prongs on it. Under the prongs there perhaps another Teflon piece captured in it? I cannot say for sure but will look at more closely obviously when the trans comes out.
Yup, that sounds like it. And Dougie reinforced it? cool.
|
128400, RE: Install day pics.
Posted by CODE4, Oct-24-09 07:56 PM
Spent another 8 hours wrenching today at the hobby shop. The first 2.5 hours had me sitting with the axles pulled, front suspension almost off (save the upper arms), and everything disconnected ready to drop the transaxle. Upon removing the four flexplate to flywheel bolts one came out with bare fingers with a nice aluminum coil on the threads. Good thing I anticipated it and had my Time Sert kit on hand. A buddy showed up then and gave me a hand. We used two floor jacks to lower the assembly at an angle and ensured there was no uneven stress on the bellhousing as we removed those bolts.
Performed the necessary repairs to the flywheel and reamed the flexplate to accept the larger ARP hardware. Installed new axle seals while the transaxle was out. Cleaned up 150k miles worth of dirt, grease, and minor oil leaks. Was unable to pull the old clutch pivot stud even with a slide hammer, so I just transferred the new Teflon tip over to the old stud. With everything back in and ready to install the ARP hardware I discovered that when reaming the flexplate holes one of them was not centered. Fuck. Out comes the transaxle again to open up that hole. This time I made sure all the fasteners would thread before committing myself with the transaxle installed.
Transaxle back on, torqued, new driver axle in, passenger axle in, driver's side suspension components all torqued. By that time it was clean up time. Tomorrow morning I need to torque the passenger suspension components and install the center crossmember. An interesting side note - I noticed this morning during removal that an unmodified SRT4 oil pan has maybe 2mm of clearance with that crossmember. With OEM motor mounts one would definitely have some contact under load.
Crossing my fingers on driving her home tomorrow.
|
128401, RE: Install day pics.
Posted by bullettdsm, Oct-25-09 02:29 AM
Originally posted by CODE4
Crossing my fingers on driving her home tomorrow.
Giggity!
|
128416, RE: Install day pics.
Posted by CODE4, Oct-25-09 06:45 PM
She is alive...
|
128418, RE: Install day pics.
Posted by Ebster1085, Oct-25-09 06:49 PM
Sickkk!
|
128430, RE: Install day pics.
Posted by MITSUracer123, Oct-26-09 06:37 AM
Where are you located at man?
|
128462, RE: Install day pics.
Posted by clipse97, Oct-27-09 06:04 PM
more pics!
|
128476, RE: Install day pics.
Posted by CODE4, Oct-28-09 10:15 PM
She is running! I have about 25 miles on the motor with only the big WG spring in the TiAL 38mm good for 10 psi. For some reason the flood clear function is not working as it should which has kept me from getting a good tune.
I have datalogged about 7 short drives and narrowed down the AFRs a bit, still very rich under boost though which is safe for right now. When shutting her down it will flood a bit too much from what I can tell, and not start. The only way to get her started is to wait >45 min or so or force an error in MegaTune by enabling an incorrect code, therefore the injectors will not open. Crank a few times and it fires off the remaining fuel. Disable the incorrect code base and it fires right up. I have messed around with setting the ADC values under the TPS configuration without success.
I will post a you tube video in a couple days or so. Big thanks to Dougie2 for helping me with some MSQ work.
|
128477, RE: Install day pics.
Posted by ez, Oct-28-09 10:58 PM
awesome! the work pays off, doesn't it? wait til you turn up the boost, or when you move east and have access to higher octane :P
|
128480, RE: Install day pics.
Posted by azdave, Oct-29-09 10:47 AM
Originally posted by ez
wait til you turn up the boost, or when you move east and have access to higher octane :P
He'll probably just make the jump to E-85 next.
|